

Should I Sysprep A Vmware Template
VMware VM Templates A to Z

Manual deployment of many similar VMs in large virtual environments tin can be a boring task. VMware provides multiple methods of virtual machine (VM) cloning in vSphere virtual environment, one of which is using VM templates. This blog mail service explores all aspects of VM templates: how they work, how to customize them, their utilise cases, and their advantages. The commodity also compares the concepts of VM templates and VM clones.
Offset 15-24-hour interval Gratuitous Trial of NAKIVO Backup & Replication to access the Enterprise Edition feature set with no capacity limitations.
What Is a VM Template?
A VM template is a principal re-create epitome of a virtual automobile that includes VM disks, virtual devices, and settings. A VM template tin can be used many times over for the purposes of VM cloning. You cannot power on and edit the template once it has been created. This is by design, so that nobody can accidentally edit the virtual machine that is used equally a template. This approach provides greater security (and a more than "foolproof" method) for VM cloning. After cloning the VM from a template, VM clones are not linked to a VM template and are independent. If yous want to edit a template, you should convert a template to a VM, edit the VM, and then convert the edited VM to a new template.
When Can VM Templates Be Used?
VM templates are useful for deploying high numbers of similar VMs, since they preserve VM consistency. For example, suppose a squad of testers needs to do their testing work on VMs with a new build of the company'due south proprietary software product. The company's organisation administrator creates a VM template and clones an identical VM from that template for each worker who needs 1. If something goes wrong during testing or a new examination scenario must be implemented, then a fresh VM can be cloned from the template with minimal try. You tin can create multiple templates from Linux and Windows virtual machines for different use cases (testing, development, education, etc.). Different templates tin can include unlike sets of software. I template tin be used for deploying VMs for a financial team, another VM template can be used for development team, etc.
The Difference Betwixt a VM Clone and a VM Template
A regular VM clone is an exact copy of the source VM at the advisable point of time. If you were to periodically clone a VM that is in a running state, the resulting clones would differ from one another. It is preferable to clone a powered-off VM, although standard cloning all the same doesn't offer all the benefits of a template.
When a VM is cloned, all settings such as static IP network, computer proper noun, and identifiers are left identical for each VM clone. Equally a result, network conflicts can occur. A VM template helps you lot forbid these issues, because a VM template cannot be edited, nor tin it ever exist in a running state. VMware provides tools that simplify guest OS customization for VM clones.
The Difference Between a VM Template and an OVA/OVF Template
OVA and OVF templates are used for distributing pre-configured software as virtual appliances. OVA and OVF are compressed file formats. They can comprise multiple VMs, which is useful for cases where software consists of multiple components that must be deployed on different machines. For example, NAKIVO Backup & Replication is available as a virtual apparatus (in addition to the other deployment options).
Deploying VMs from OVA/OVF templates is similar to deploying from VM templates. OVA/OVF tin can exist accessed from vCenter inventory. Users can also deploy VMs using OVA/OVF from local storage (e.chiliad., deejay C: on a user'southward figurer), mounted USB devices, and remote web servers that are attainable from vSphere Web Client.
The OVF (Open up Virtualization Format) package tin contain certificate files, ISO optical deejay image files, etc. The OVA (Open Virtual Appliance) file is similar to the TAR annal file; it can contain multiple OVF files.
VM templates are not compressed. They can be accessed merely from locations available for vCenter (local ESXi datastore, shared datastore) and are not intended for distribution among customers.
VM Guest Bone Customization
Guest OS customization is a vSphere feature that allows users to change the settings of a VM clone's Linux or Windows invitee Os. If the traditional arroyo were used, you would accept to manually beginning a VM, log into the guest OS, so change the configuration in unlike parts of the Bone via a GUI or the command prompt provided by the OS. This method is cumbersome and consumes significant amounts of time. With VMware's Guest Bone customization, you can create a guest OS customization specification and use this specification for every VM clone produced from the template. You can hands change the IP network settings, hostname, username, password, fourth dimension zone, license settings, SID (security identifier), and Domain/Workgroup for a guest OS. (Annotation: the customization parameters for Linux and Windows differ slightly.) Using VM guest Bone customization is convenient and saves you lot fourth dimension. Configure your clone settings from one place in but a few steps with the customization wizard.
Yous tin create multiple customization specifications for Linux and Windows virtual machines to brand them useable as soon as the VM clone is deployed from the VM template. If you lot are going to use invitee Os customization specification, set up your VMs and so that they meet the requirements.
The following components must be installed on a guest VM for this purpose:
- VMware Tools
- Sysprep tool (Windows)
- Perl (Linux)
- Net tools (Linux)
The invitee Bone must be installed on a virtual deejay connected to the SCSI 0:0 node.
Check whether or not your guest Bone of choice is supported by your version of vSphere in the VMware Guest Os Customization Back up Matrix.
Preparing a VM for Template Creation
Before creating a template, you should prepare your VM. Allow's consider the main points of VM preparation.
Creating a new VM. Create a new VM with sufficient CPU, disk, and memory resource. Select the appropriate VM compatibility options. For example, if you have hosts with ESXi vi.5 and ESXi half-dozen.0, your VM should exist compatible with ESXi 6.0 or subsequently (virtual hardware version 11), so that option should be selected. Optionally, you tin can enable CPU Hot Plug and Retentivity Hot Plug; this lets you add processor and retentiveness resource while a VM is running.
Disconnecting unused devices from a VM. If you are using a VM that already exists, disconnect unnecessary hardware devices such equally virtual floppy deejay drives, virtual COM controllers, LPT controllers, etc. If USB devices and CD-ROMs will non exist used afterwards software installation, they tin can also exist asunder. This approach reduces the risk of potential attacks and, every bit a result, improves security. You can besides enter the virtual BIOS and verify that all unnecessary devices are disabled in the VM's BIOS.
Installing the required software on a VM. Install the operating organisation on the VM. Then install all the necessary updates, security patches, antivirus protection, and specific software needed for your purposes. Configure your OS settings, such as environs variables, remote admission, etc. Set passwords for users and the administrator(southward). Passwords should never expire; this style, you can prevent accounts from getting locked. You lot can as well configure a default user profile.
Installing VMware Tools. VMware Tools is a set of drivers and utilities that increases the performance of a guest Os running on a VM too as facilitating VM management. Install VMware Tools on the invitee OS. This is an important requirement for using VM templates because VMware Tools are used when customization specifications are applied for irresolute IP configuration, host name, time zone, or other guest OS settings when VMs are deployed from a template.
Removing unwanted software components from a VM. You tin can make your VM template more lightweight by optimizing the guest OS. The following are some general recommendations for Windows systems that may be useful for configuring your VMs:
- Disable unnecessary system services, such as wireless services, themes, Windows Audio, Windows Search, etc.
- Disable Windows Aero, equally it includes graphic furnishings that consume significant amounts of computing resources.
- Disable the screensaver to salvage some CPU resources.
- Uninstall tablet PC components.
- Uninstall unnecessary Windows components, such every bit Games, Messenger, etc.
- Disable all unnecessary startup applications and services.
- Delete temporary files, including files used for software iInstall the SSH server nstallation.
- System restore can be disabled. You tin utilise VMware snapshots instead of the Windows system restore functionality. If you want to back up your VMs for robust data protection, you can employ NAKIVO Fill-in & Replication.
You can deport out a deeper cleanup of your invitee Bone to optimize VM functioning depending on your demands.
In the following sections, you can learn well-nigh configuring a Linux virtual automobile for the purposes of making a VM template (with which you lot could use guest Os customization specification). This walkthrough uses the example of Xubuntu 16 x64. It also discusses how to create a customization specification for further cloning of VMs from your template.
In guild to prepare Xubuntu Linux for guest OS specification customization, enter the Linux console (Concluding) and run the post-obit commands as a user with root privileges:
i. Install the SSH server for remote access via SSH.
apt-go install openssh-server
two. Restart the SSH server after installation.
service ssh restart
three. Install VMware Tools for Linux from repositories (The alternative mode to install VMware Tools is by inserting an ISO image into a virtual CD bulldoze of a VM).
apt-become install open up-vm-tools
4. Install the networking toolkit.
apt-become install cyberspace-tools
five. Install Perl.
apt-get install perl
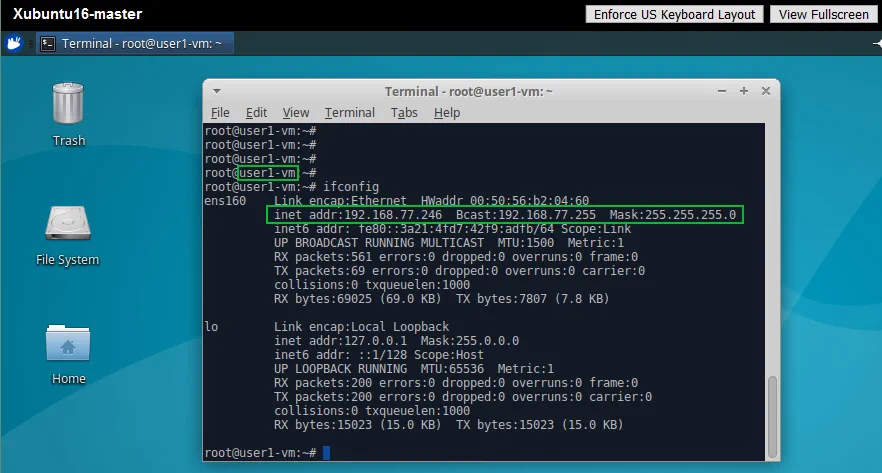
Once the packages have been installed, check the computer proper name and IP configuration of the Linux VM. Type ifconfig to view the IP configuration of network interfaces. In this example, the virtual network interface used past the source VM has an IP accost of 192.168.77.246.
Creating a VM Template
One time your VM has been prepared, you tin can create a VM template. You must have admission to vCenter Server for managing your ESXi hosts, virtual machines, storage, networks and other vSphere components. Every bit mentioned above, in the configuration examples considered in this blog mail service, a VM running Xubuntu Linux is used. Two methods tin exist used for VM template creation – converting to a template and cloning to a template.
Converting to a template. When you catechumen a VM to a template, your source VM gets replaced by the resulting template, and every bit a event, your source VM would exist unavailable. In society to catechumen a VM to a template, have the following steps:
- Log into vCenter with VMware vSphere Spider web Client. Become to Hosts and Clusters or VMs and Templates, then select the VM that yous have prepared for conversion.
- Ensure that the VM is powered off when you convert it into a template.
- Right-click the VM, and in the resulting context menu, select Template > Convert to Template.
- A confirmation message is displayed: Catechumen the virtual machine "VMname" to a template? Click Aye to continue.

Cloning to a template. This pick allows you to preserve the original VM and copy the VM data to a template. The source VM can be powered on or off while you are cloning the VM to a template. Permit's consider how to create a template by cloning the original VM. Similarly to the previous method, navigate to your VM in the vSphere Web customer. Right-click the VM, and in the context carte click Clone > Clone to Template.

A cloning banana is launched. Go along through the steps as follows.
- Select a name and binder. Define a name for your VM template and select a target location. In this example, Xubuntu16-examination is the template proper noun, because this template is going to exist used for testing purposes. Click Next.

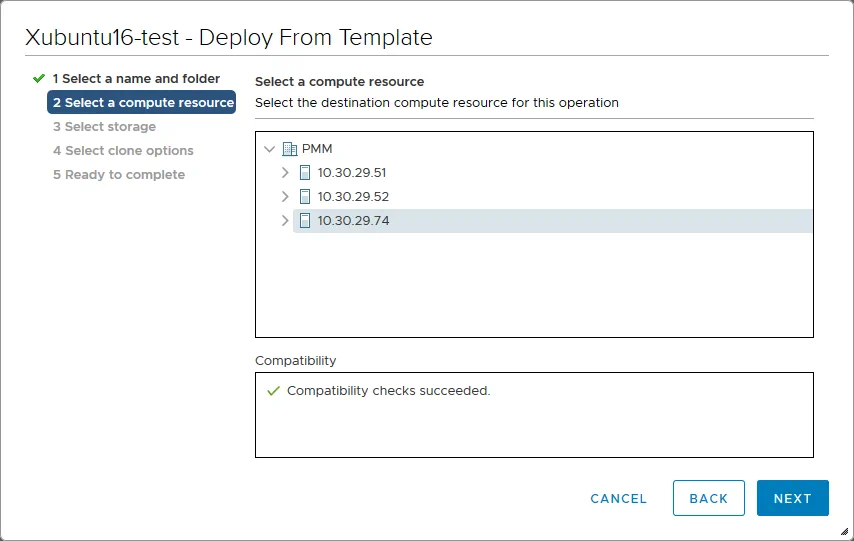
- Select a compute resource. You tin select an ESXi host or a cluster equally your resources. Click Next.

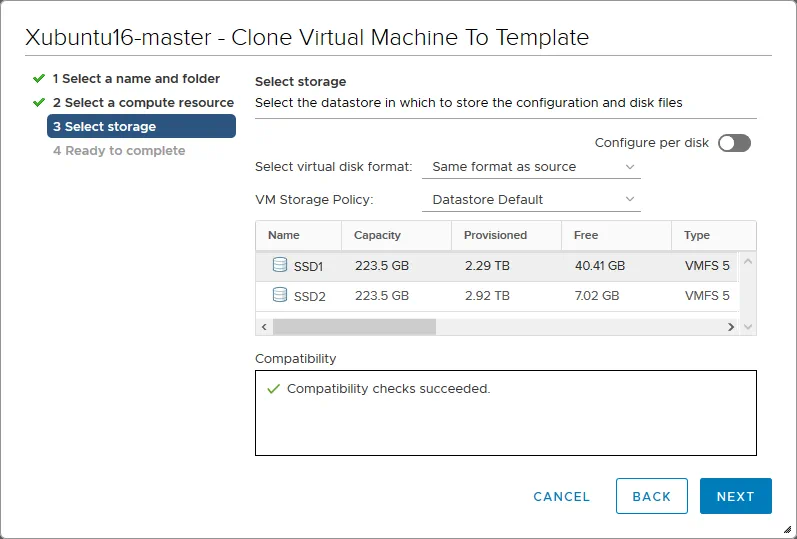
- Select the storage location in which to store the template. You can gear up a virtual disk format (thin-provisioned, lazy zero thick-provisioned, or eager cypher thick-provisioned) or simply let the virtual disk format be defined by that of its source. You lot tin can define a custom VM storage policy here, if needed. Click Side by side.
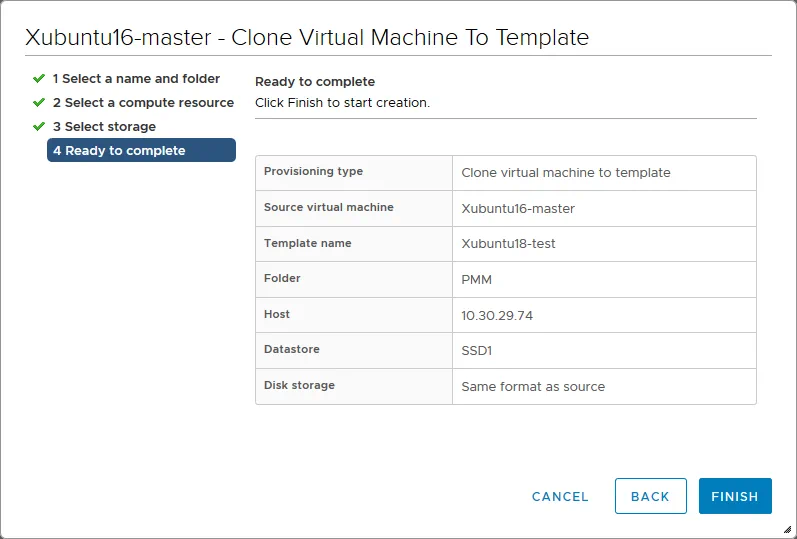
- Set up to consummate. Check the summary and click Finish to go on with the template cosmos.
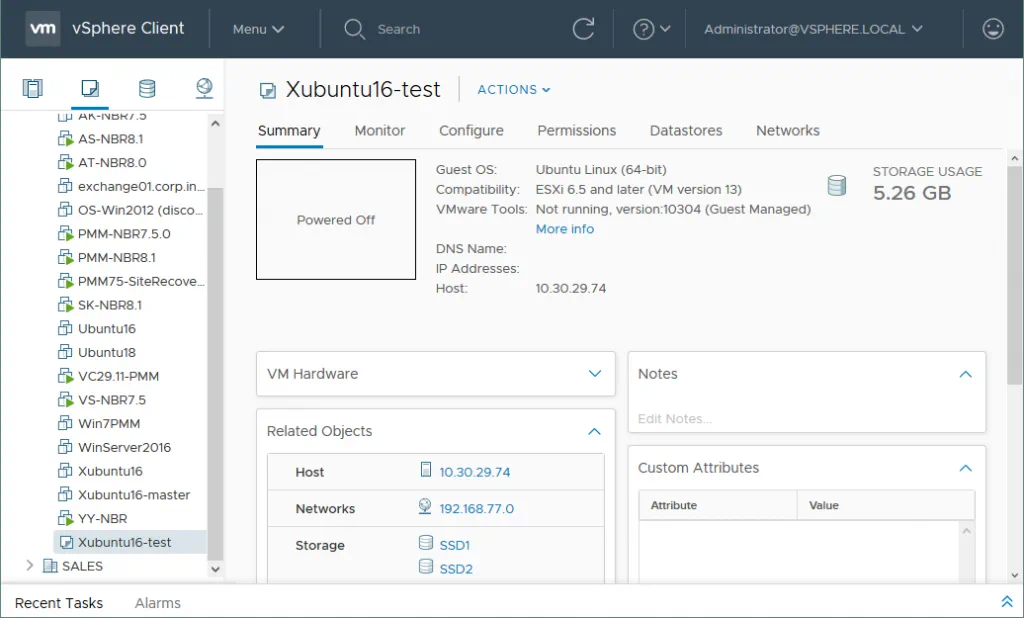
Now, your newly created VM template is displayed at the terminate of the list in the VMs and Templates section. As you tin can see, the storage usage of the original VM and the VM template is the same (compression is non used for VM templates, as mentioned above).
If you go to the Storage section, and then select the datastore and the directory of your VM template, y'all should meet that all the files are similar to the files of your source VM except for one – the VMTX file. The VM configuration file has a .VMTX extension instead of a .VMX extension, which is used for configuration files of regular VMware VMs.

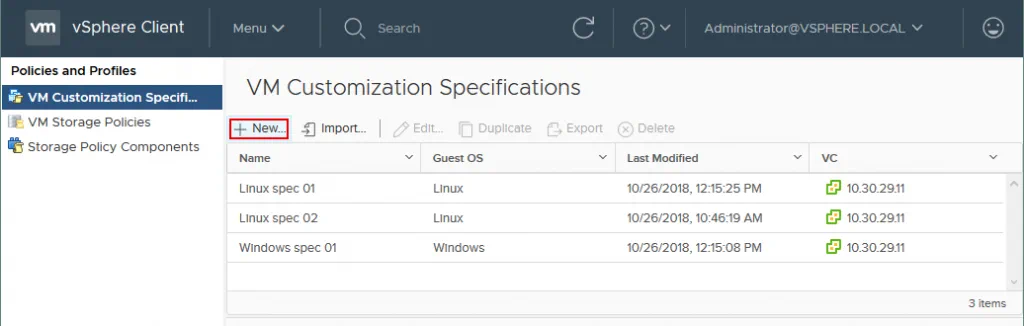
Creating a VM Guest Customization Specification
Now that a VM template is created, you can create a VM guest customization specification. In order to practice this, open the Menu, and so click Policies and Profiles.

Make sure that VM Customization Specifications are selected in the left pane. Click New to create a new VM customization specification. Yous should and so run into a new wizard window launched.
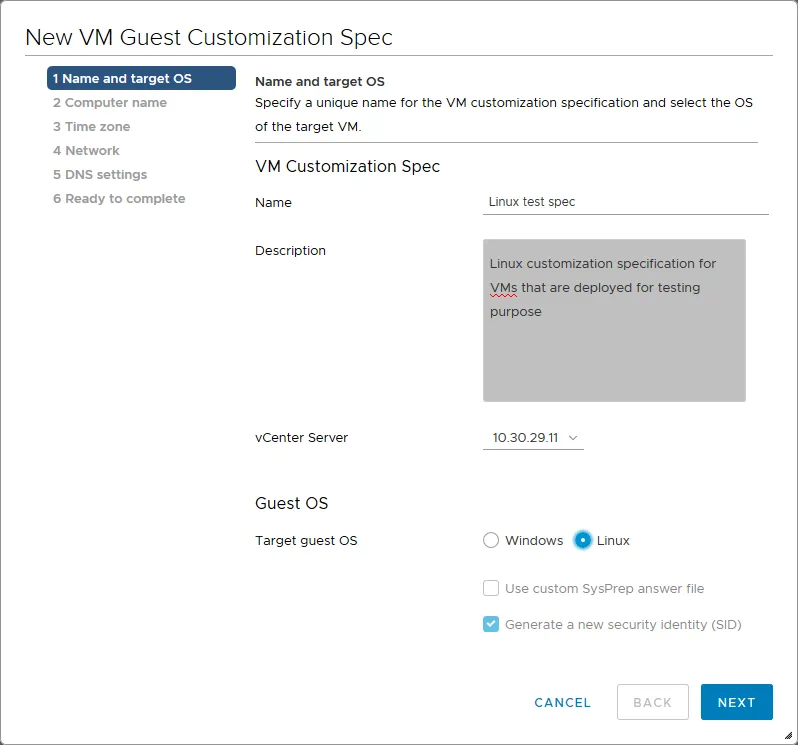
- Name and target OS. Set a unique proper name for the specification, enter a description, select the vCenter server, and specify the guest OS of the target VM (Windows or Linux). In this walkthrough, Linux is used, and the specification is called Linux test spec. Click Next.
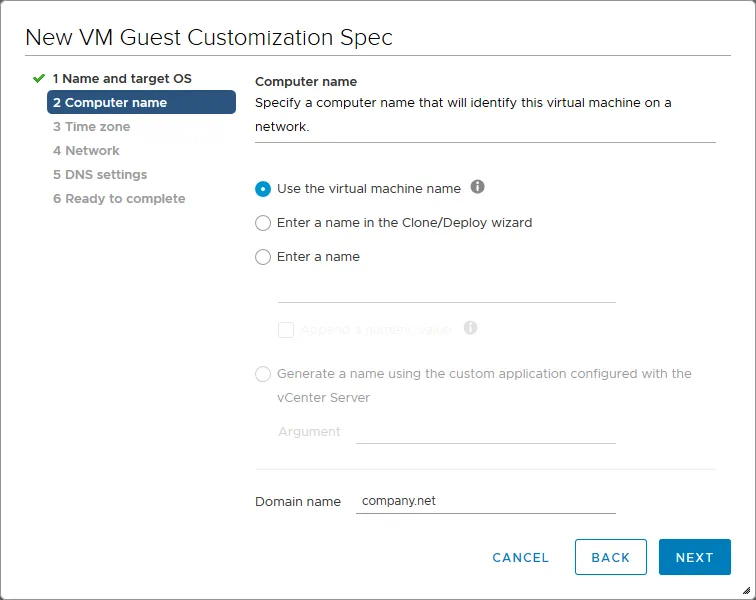
- Computer Name. Prepare a estimator proper name (host proper name) and domain name. There are three bachelor options to specify a computer name:
- Utilise the virtual motorcar proper name. The computer proper noun of the guest Bone inside the VM would be the same equally the VM name. Using this pick can be convenient for administration purposes.
- Enter a name in the Clone/Deploy Sorcerer. You tin manually enter a reckoner name when you lot apply the customization specification for a VM clone. You can use this option if you don't know which names you want to use for these VMs in the future.
- Enter a proper name. You can enter the reckoner name correct now. In order to ensure uniqueness, tick the Append a numeric value checkbox (if you deploy multiple VMs, each VM must have a unique computer proper name for the guest Os).
A figurer name cannot exist more 63 characters in length – if you try to input anything longer, the name gets truncated. Click the Next button to continue.
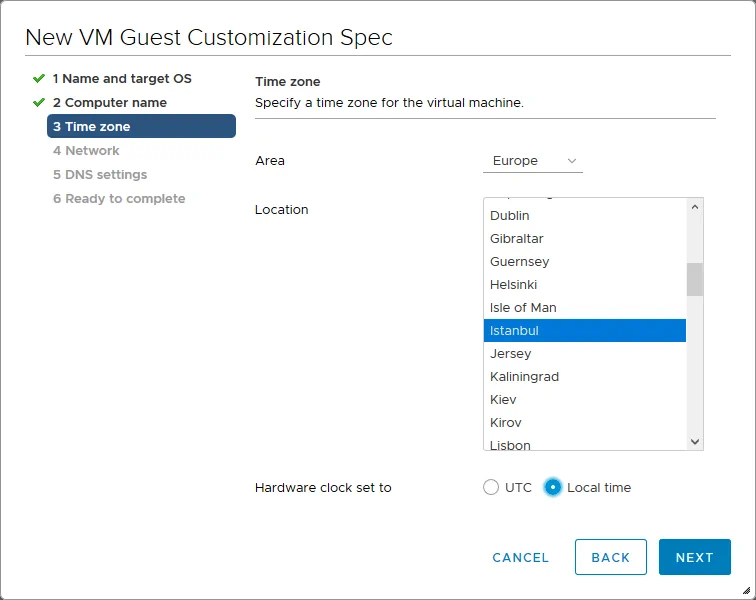
- Time Zone. Specify a time zone for the virtual automobile. So click Next.
- Network. Specify the network settings for the virtual machine. There are two options:
- Use standard network settings for the invitee OS, including enabling DHCP on all network interfaces.
- Manually select custom settings.
For the purposes of this walkthrough, the 2d pick is used; let's configure the network settings manually. You tin click the Add button to add a virtual network interface controller (NIC) to your VM. Click the icon with the row of three dots and select Edit in the resulting context menu.
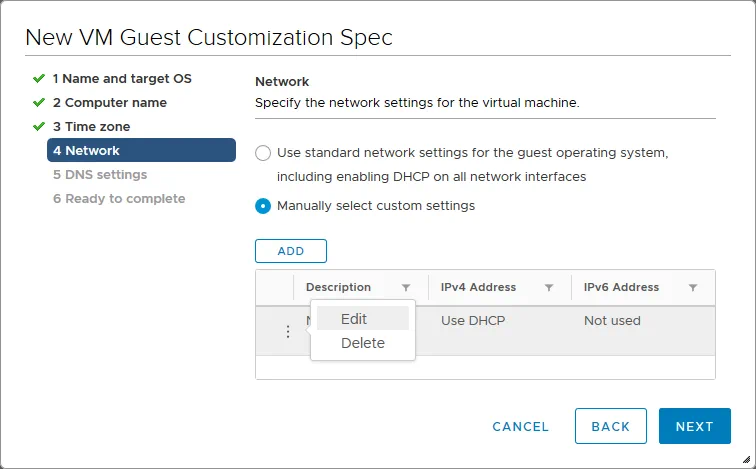
A new configuration window is launched. There are three options available in the IPv4 tab.
- Use DHCP to obtain an IP address automatically.
- Prompt the user for an IP address when the specification is used. Yous tin preconfigure a subnet mask and default gateways using this option, but the IP address must exist entered when the specification is applied to the VM.
- Use custom settings. This selection is similar to the previous one, but the IP address can exist set right now.
IPv6 tin can exist disabled. Click OK when you accept finished configuring the network options. Then click Next.

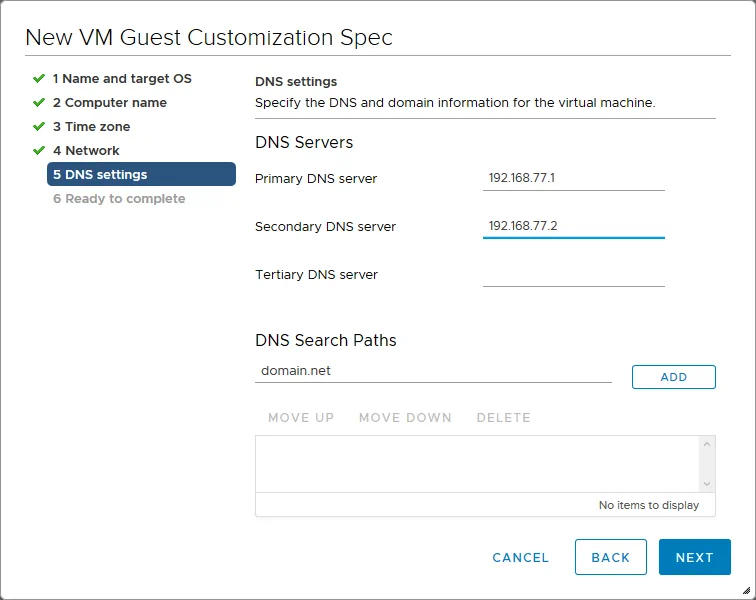
- DNS settings. Specify the DNS servers and DNS search paths for the VM. You can set to three DNS servers. Click Next.
- Gear up to complete. Review your settings and click Stop when you lot are satisfied.

You lot should now exist able to see your guest Bone customization specification in the listing of VM customization specifications. Y'all tin edit, duplicate, export, and delete the specifications from hither.

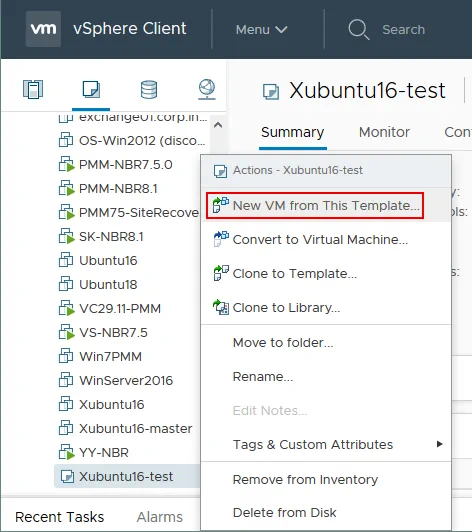
Creating a VM from a Template
Now that you have a VM template and a guest OS customization specification, you can create a virtual machine from your template. Go to the VMs and Templates section, right-click the template you created, and select New VM from This Template. In this case, the template is preserved. If yous use the Convert to Virtual Motorcar option, then your template gets converted to a VM; it would no longer be equally a template.
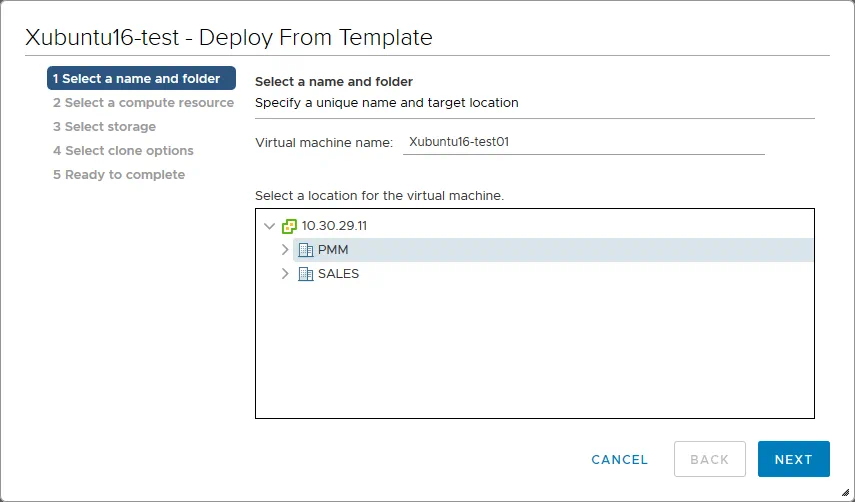
The Deploy From Template wizard is launched.
- Select a proper name and folder. At this stage, you lot should input a unique VM name and a target location. In this walkthrough example, the virtual automobile is named Xubuntu16-test01. Click Next to proceed.
- Select a compute resource. Hither, you tin select the ESXi host or cluster on which the VM should run. Click Next.
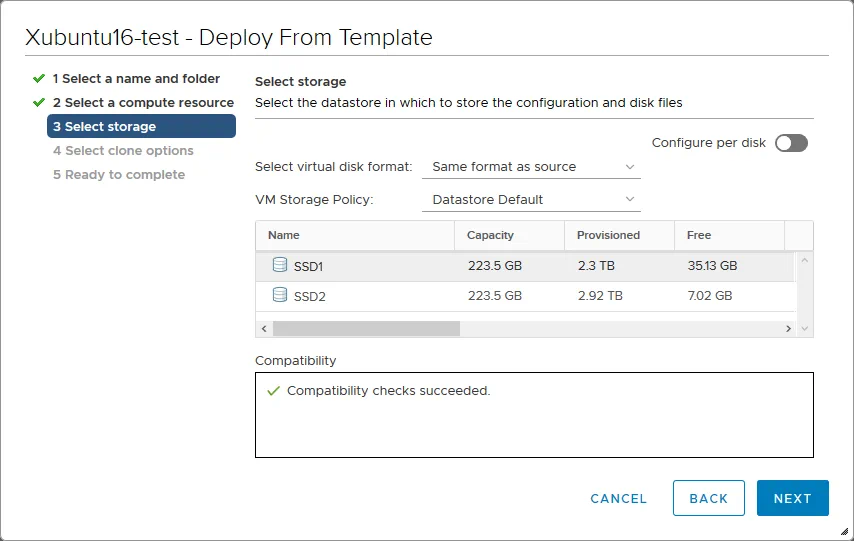
- Select storage. Select the datastore in which to store configuration and disk files. Select the virtual disk format. Y'all can manually gear up the virtual disk format (thin-provisioned, lazy zero thick-provisioned, or eager nil thick-provisioned) or leave the virtual disk format the same as that of the source. Select a VM storage policy if necessary. Click Adjacent.
- Select clone options. In order to utilise your recently-created invitee Os customization specification, tick the Customize the operating system checkbox. Then click Adjacent.

- Customize guest OS. Select the invitee Os customization specification you created from the list. Recall that in this walkthrough, the name of the specification is Linux test spec. Click Next to proceed.

- User settings. Recollect from earlier in this walkthrough that the guest OS specification customization used hither allows the states to set up the IP address during VM clone creation. Let's define the IP accost for a virtual network adapter of this VM. In this case, the IP address is 192.168.77.240. Click Side by side.

- Ready to consummate. Bank check the configuration summary and click Finish to initiate VM creation.

One time the VM has been created from a template with your guest OS customization specification, run the VM and launch the VMware Spider web Console to access the invitee Os interface. In one case you lot log into the VM, the VM is restarted and your customized settings are applied. After the VM has rebooted, open the Linux console and verify the host name, IP configuration, and time zone. You can check these parameters by entering the following commands.
View the host proper noun:
less /etc/hostname
You can also see the host name in the primary prompt cord.
Check the IP configuration of network interfaces:
Ifconfig
Check the time zone set in the system:
timedatectl | grep "Fourth dimension zone"
Bank check the gateways in the routing table:
netstat -rn
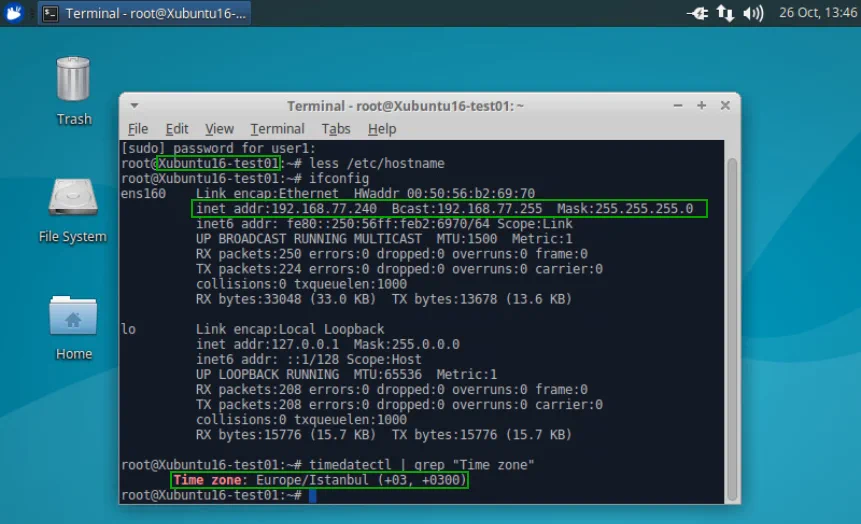
As you lot can see from the above screenshot with the Linux console and the beneath screenshot showing VMware vSphere client, the IP address, figurer name, and time zone take been changed according to the settings divers in our guest Bone customization specification. The VM proper noun and the host name are the same.

Automation with PowerCLI
The walkthrough above has explained the cosmos and application of VM templates with the vSphere Spider web Customer GUI (graphical user interface). However, alternatively, you could use PowerCLI to manually create complex scripts and make VM deployment more automated. Some of the cmdlets that could be useful for these purposes are listed below:
New-Template – creates a new VM template.
New-OSCustomizationSpec – creates a new guest Os customization specification.
Get-OSCustomizationSpec – retrieves the Os customization specifications from vCenter.
Set-OSCustomizationSpec – changes the specified Os customization specification.
Get-OSCustomizationNicMapping – retrieves the NIC mapping settings for Os customization specification.
Set-OSCustomizationNicMapping – change the NIC mapping settings for the specified OS customization specification.
New-OSCustomizationNicMapping – adds the NIC mapping settings to the OS customization specification.
For the full list of PowerCLI cmdlets, their syntax, examples and other related information, refer to the VMware PowerCLI Reference web page. You tin can also read our blog post about PowerCLI scripting.
Advantages of VM Templates
VM templates with guest OS customization specification are useful for VM deployment, specially in large environments. The primary advantages of using VM templates are summarized hither:
- Standardize VM deployments. Standardization allows you to avoid redundant efforts also as improving quality and productivity. Assistants of standardized VMs is easier than assistants of non-standardized VMs.
- Fewer errors during deployment. When several virtual machines must exist deployed manually in succession, there are many opportunities for a system administrator to forget something, which could cause errors. As an alternative, the system administrator tin can spend time one time to create a perfect VM template; this can then exist used for all farther (similar) VM deployments going forward.
- Automation of the VM deployment process. Automation makes deployment easier and faster, increasing productivity while improving security.
- Time savings. This benefit is related to the advantages listed above that brand templates an efficient solution. Furthermore, saving fourth dimension means reducing costs.
Conclusion
Today's blog post has covered VMware VM templates, including their usage and configuration with VMware vSphere customer. A VM template is a master image that tin be used for making clones during mass VM deployment. VM templates cannot exist edited and powered on similar regular VMs, which improves security. Guest OS customization specification helps you customize OS settings like network configuration, computer name, time zone etc. after VM cloning past using the single wizard, thus making VM deployment faster and more convenient. As a result, you gain important advantages such as automation, reduced mistake count, standardization, and rational time consumption – which can likewise help you relieve your budget!


Should I Sysprep A Vmware Template,
Source: https://www.nakivo.com/blog/vm-templates-a-to-z/
Posted by: scotttheatione.blogspot.com
0 Response to "Should I Sysprep A Vmware Template"
Post a Comment