

How To Draw A Magic Circle
A crochet magic ring, also called an adjustable ring or a magic circle, is a very useful technique for crocheting in the round. I love using the magic ring method considering it eliminates that pesky hole that can form in the heart of your work.
To use a magic band in crochet, you'll make the first round of stitches into an adjustable loop. So, merely pull the yarn tail to close up the loop nice at tight.
Do you want to acquire how to crochet a magic ring? This beginner tutorial will walk you through the process of crocheting a magic band, step by stride. Once you get the hang of the magic ring technique, y'all'll never desire to go dorsum!

What is the Magic Band Techinique?
The magic ring is a great way to begin a crochet project that's worked in the round. To utilise the magic band method, you lot'll make a loop of yarn, and piece of work the beginning round of stitches into that adaptable loop. And then, you'll pull one end of the loop to tighten it. This volition close the ring, eliminating the small hole that sometimes forms in the center of your work.
Advantages of The Magic Ring Technique
Compared to other traditional methods, the magic circumvolve technique is the best way to create a tightly closed starting ring. The advantage of the magic band method is that it eliminates the small pigsty in the center of the first round of circular crochet.
Can Beginners Employ the Magic Ring?
If you are a beginner, I know that the crochet magic ring technique tin can seem intimidating or overly fiddly. I go it – I certainly had problem remembering it at get-go.
Simply don't be discouraged! The magic ring method is a handy crochet skill that everyone tin larn. It's certainly worth the effort information technology takes to learn. And afterwards mastering this technique, you'll wonder how yous ever crocheted without it!
When to Apply a Magic Ring
You tin utilise the magic band crochet technique to outset lots of different crochet patterns, like granny squares, elevation-down hats, and amigurumi projects.
If your pattern calls for a Magic Band, y'all may see it written equally:
- "Work 6 sc in magic ring."
The term "Magic Ring" may as well be abbreviated as MR (or MC for magic circle).
Replacing Other Starting Methods with a Magic Ring
Other patterns call for older/traditional starting methods, like a starting chain of iv stitches joined into a ring.
Other starting methods may be written as:
- "chain iv, slip stitch in the outset chain" and then "work the showtime round in that circle"
- "chain ii, vi single crochet in 2nd concatenation from hook".
For virtually crochet projects that are worked "in the round", you can simply substitute the Magic Ring method. In each of the 2 cases above, replace the chain stitches with a magic ring, and then make the first round of crochet stitches into the magic ring.
Magic Ring Tutorial
In this step-by-step tutorial, I will bear witness you how to use the Magic Ring (likewise called Magic Circle or Magic Loop).
Note: These instructions use U.s.a. terms, and demonstrate the right-handed method.
At that place are many different means to demonstrate the technique, but this is my favorite method. I like to loop the strand of yarn over my fingers then that I take proficient control of it. (I find information technology harder to practise the Magic Ring technique when the loop is hanging in the air, or laid out flat on a table.)
How to Crochet the Magic Ring
The magic ring is worked in two parts. The first step is to make the adjustable loop. Then, the next stride is to work whatsoever stitches your pattern calls for into that adjustable loop.
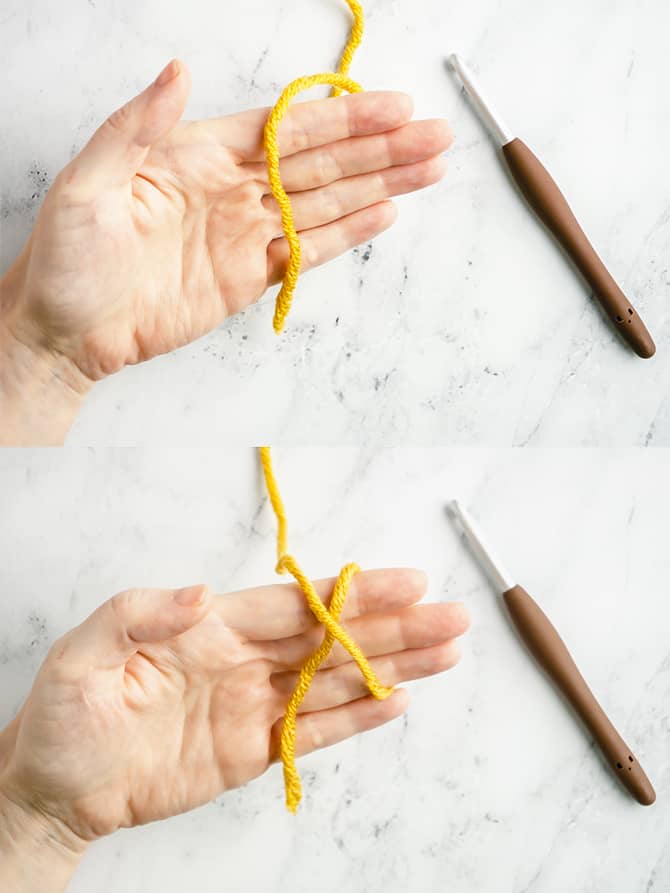
Pace one: Loop the Yarn Around Your Fingers
Place the ball of yarn on the table. Lay the tail finish of your yarn confronting your open left hand, with the tail end pointing toward you. Loop the working finish (aka ball end) of the yarn loosely effectually the back of your first two fingers. Cross the working cease of the yarn over on top of the tail finish, and to the left. Use your pollex to pinch the yarn where it intersects, holding information technology in identify.
Turn your manus toward you until your palm faces down toward the table. When you wait at the dorsum of your paw, yous should see 2 parallel strands of yarn. The working yarn (aka ball terminate) will exist on the left, and the tail yarn end will be on the right.

Stride 2: Insert the hook and pull up a loop.
Agree the crochet claw in your right hand. Working from right to left, slide the crochet hook under the correct-hand piece of yarn and over the left-hand piece. Take hold of the left-hand yarn and pull upward a loop. Equally you pull upwardly, rotate the hook up towards you.
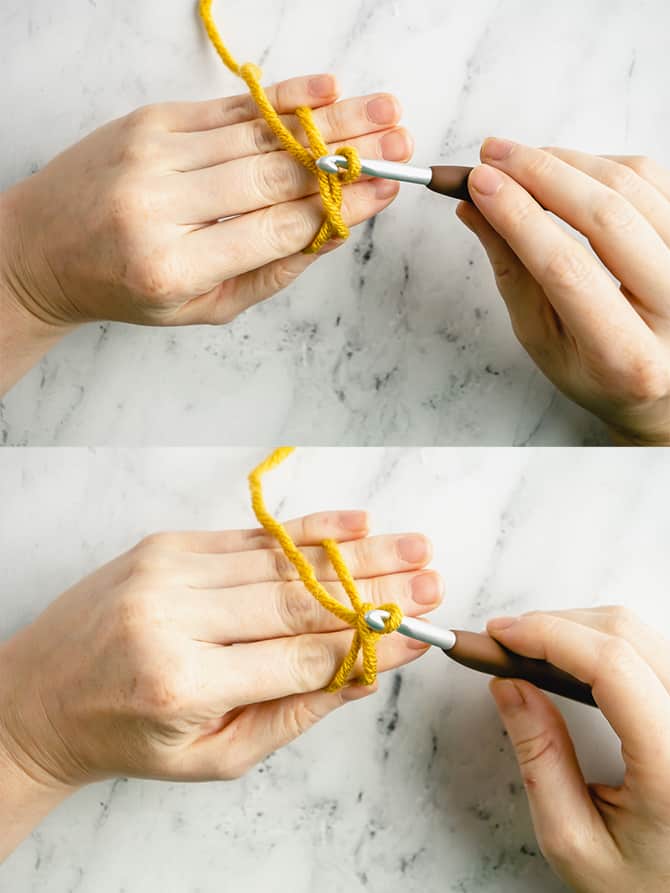
Stride iii: Chain 1 (or the required number of chains.)
Continue holding the circle of yarn in your left mitt. Wrap the working yarn from back to front end over the claw. Draw the yarn through the loop on the hook. This completes i chain. (This does not count as a stitch.)
Note: The number of chain stitches you make in this footstep depends on the type of run up used in the first round of the blueprint.
- If your pattern starts with a circular of single crochet, you'll only make this one chain.
- If your design starts with a round of half double crochet, brand 1 more than chain for a full of 2 chains.
- If the pattern starts with a round of double crochet stitches, make a total of 3 chains.

Step 4: Make stitches into the ring.
At present it's time to make your first round of stitches into the ring. Insert the hook into the center of the ring, and draw up a loop to begin your kickoff unmarried crochet. (You will be crocheting over both strands: the loopand the yarn tail.)
Complete the single crochet: Yarn over and draw the yarn through both loops on the claw.
Continue making stitches into the loop until yous have made the required number for your pattern. The ring may notwithstanding await besides loose and open, just we will gear up that in the next footstep.

Footstep 5: Tighten the band.
Hold on to your stitches with the fingers of your right hand. With your left paw, pull the yarn tail to depict the center of the ring airtight (similar a drawstring bag). Equally you do this, the turning chain and the last run up of the round will come closer together.
Step 6: Slip Run up to shut the circular.
If you are working in joined rounds, work a slip stitch into the offset stitch to join the round. (Exist careful not to stitch into your chain, only rather the first sew together of the round.) And so, continue with the design.
If you are working in a continuous spiral, do non join the circular with a slip sew. Instead, merely get-go the next round in the first stitch of Round i.
Finishing up: If the heart ring loosens equally y'all work the pattern, you can pull on the yarn tail again to tight it back upwardly. One time you weave in the ends, information technology should stay tightly in place.
Commonly Asked Questions
Still have a hole in the heart?
If your get-go round of stitches still has a hole in the eye, it could be your yarn to blame. Some fibers don't compress likewise as others.
Or, information technology could exist that you are trying to brand besides many stitches in that first round. Normally, the magic ring is worked with a starting round of near 6 stitches.
Is your work unraveling?
Call back to go out a long enough yarn tail to weave in at the end of your project – at least half-dozen inches. Weave in the yarn tail every bit securely as you lot tin can. Otherwise, the magic ring might unravel.
More Beginner Crochet Tutorials
If you'd like to learn more crochet stitches and techniques, you may exist interested in these posts:
- How to Single Crochet (sc) for Beginners
- How to Half Double Crochet Sew together (hdc)
- How to Slip Stitch in Crochet (sl st) for Beginners
- How to Crochet Moss Run up (Linen, Granite, Woven Sew)
Have questions? Join the Facebook Group!
I hope this article was useful for you! If you have any boosted questions, feel free to join my Facebook Group. I created this group for you to share pictures, ask questions, and help each other out.
What's Adjacent?
Pin this postal service: Salve this tutorial to your Pinterest boards and then that you tin can come back to it subsequently.
Leave a comment: I honey to hear your feedback. Tell me in the comments beneath!
Share on Instagram or Facebook: When y'all make this project, share it on social media and tag me @sarahmaker. I love to see what you lot brand!
Instructions
- Lay the tail finish of the yarn against your open hand. Loop the working end of the yarn loosely effectually the first two fingers.
- Working from right to left, slide the crochet hook nether the correct-paw piece of yarn and over the left-hand slice. Grab the left-hand yarn and pull up a loop.
- Using your hook, grab the left-hand piece of yarn again, and pull it through the loop on the hook. Concatenation i (if doing SC)
- Brand your first round of stitches into the ring. Insert the hook into the magic band, and draw up a loop to begin your first SC. (Y'all volition be crocheting over the loopand the yarn tail.) Complete the SC every bit usual. Continue making stitches until you have the required number for your pattern.


Sarah Stearns has helped thousands of makers discover their next craft project with costless patterns and pace-by-stride tutorials on her blog, sarahmaker.com. Read more than.
Her work has been featured in Scientific American, Good Housekeeping, Vox, Apartment Therapy, and more.

Source: https://sarahmaker.com/crochet-magic-ring/
Posted by: scotttheatione.blogspot.com
0 Response to "How To Draw A Magic Circle"
Post a Comment